Introduction
Medusa is an open source Node.js-based composable commerce engine that offers a flexible and modular solution for ecommerce businesses. Its architecture consists of three essential components: the Medusa server, the admin dashboard, and the storefront.
You can host Medusa’s server on any of your preferred hosting choices, and one way to host it is using Render.
What is Render
Render is a unified cloud to build and run all apps and websites with free TLS certificates, a global CDN, DDoS protection, a private network, and auto-deploy from Git.
Render makes deploying your application as easy as pushing your code to source control. Once you connect your GitHub or GitLab account to your Render account, Render will automatically build and deploy your services with every push.
Prerequisites
To follow along with this tutorial, you need
A working Medusa server application. You can follow the quickstart guide to getting started.
GitHub account that needs to be linked with a Render account, so you can pull your code to make the deployments.
Furthermore, you should configure Medusa to work with PostgreSQL and Redis. You can follow the Configure your Server documentation to learn how to do that.
Setting up a Project on Render
Let’s begin by setting up the project on Render.
Create the Postgres Database
Log in on the Render platform, go to the dashboard, click the New+ button, then click on the PostgreSQL button.
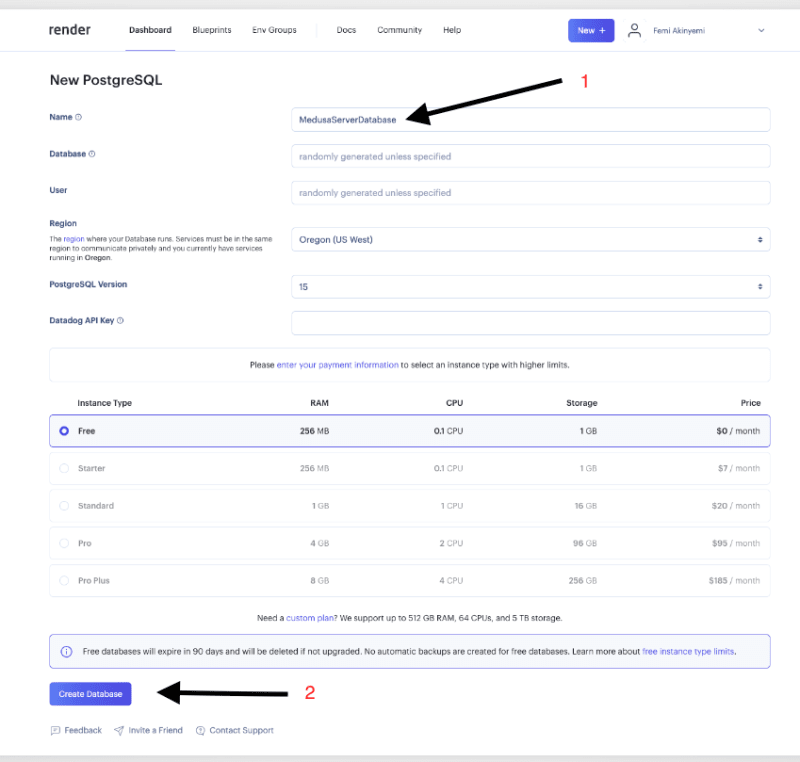
After clicking this, you'll be redirected to the next page, where you can name and create the database.
By clicking the create the database, you will be redirected to the POSTGRESQL general page, where you will see the newly-created database.
You’ll use the database Url in the next section.
Create the Redis Database
The second step is to add a Redis database to handle the event queues of your Medusa server.
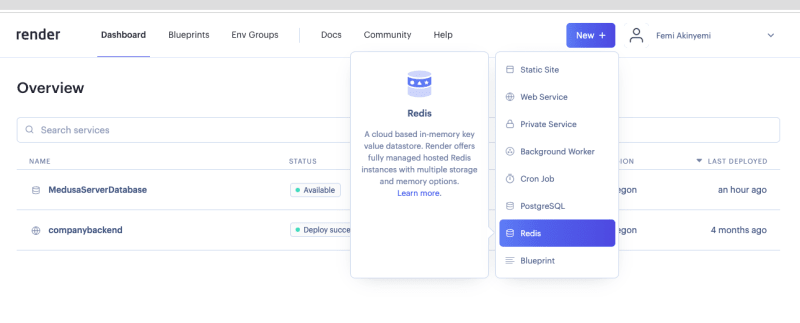
On your render dashboard, click the New+ button and the Redis button.
After clicking this, you'll be redirected to the next page, where you can name and create the Redis.
By clicking the create the Redis, you will be redirected to the Redis general page, where you will see the newly-created Redis.
You’ll use the Redis Url in the next section.
Deploy Medusa Server
The next step is to prepare the Medusa server to deploy. Navigate to your Medusa server directory and open the medusa-config.js file. Ensure that you have configured your database to use PostgreSQL. Within the exported object of the medusa-config.js file, make the following changes:
module.exports = {
  projectConfig: {
    redis_url: REDIS_URL,
    database_url: DATABASE_URL,
    database_type: "postgres",
    store_cors: STORE_CORS,
    admin_cors: ADMIN_CORS,
  },
  plugins,
};
Next, remove the Dockerfile file from your repository's root directory. If it exists, render searches for this file automatically and use it to deploy your server. However, you will not be using docker in the deployment process.
Commit your changes, and push them to your remote GitHub repository. Once your repository is ready on GitHub, return to your Render dashboard to proceed with the deployment.
On your render dashboard, click the New+ button, then click on the Web Service button.
Connect your Medusa server repo
Select or search for your repository and click the connect button.
You will be redirected to the settings page when clicking the connect button.
Here, you must provide a unique name for your project, specify the region in which your web service will run, the repository branch to be used for your web service, the root directory, the runtime, the build command, and the start command.
Please note that you should replace the original start command with the following:
medusa migrations run && medusa develop.
This particular start command enables you to create and execute your migrations or update the Medusa backend. Additionally, it ensures that these migrations are executed before the backend starts, guaranteeing their completion.
Add Environment Variable.
To add an environment variable, click the Advanced button above the Create Web Service button on the settings page and select Add Environment Variable with the following variables:
PORT=9000
JWT_SECRET=something
COOKIE_SECRET=something
DATABASE_URL=<<DATABASE_URL>>
REDIS_URL=<<REDIS_URL>>
It’s recommended to use other values for JWT_SECRET and COOKIE_SECRET than something for better security.
The last properties are the URLs to connect to the databases. You need to add the database URLs you got when you created the Postgres and Redis databases earlier.
Scroll to the bottom of the settings page and click Create Web Service button.
Upon successful deployment, you will observe a status message indicating that the deployment has been successful with the text deploy succeeded.
Test the Backend
Once the backend has been successfully deployed, you can access the app in your browser using the domain name. For instance, entering the URL <YOUR_APP_URL>/store/products will display the currently available products on your backend.
Conclusion
Deploying a Medusa server on Render is an effortless and prompt process. Upon completion, you can direct your efforts toward augmenting your Medusa server with novel functionalities, such as custom endpoints, services, or plugins.
To update your server with the latest changes, push them to your GitHub repository. Render's automated system will detect the updates and commence a fresh deployment, incorporating the new features into your application.
For further information regarding the customization of your store or the linkage of a storefront to your store, you can check out Medusa's documentation.
If you have any issues or questions related to Medusa, then feel free to reach out to the Medusa team via Discord.


